Google Maps API Application
This was a project I started in 2020 during my third year at UWS Paisley for my Bachelors Degree.
I was tasked with completing a Google Maps API Application that would allow users to view different
restuarant locations within a particular city.
I had to ensure that users were able to create an account and log in,
a new cookie key was created and stored within a folder for each user that signed into their account,
users could view the pre-set locations I had to set within the Google Maps API,
add new markers to the map, delete markers, drag markers to new locations within
the map and have the new information be updated and stored within the database and
also allow for users to view the XML file.
Technologies:
- - PHP
- - MySQL
- - Ajax
Drag and Drop Feature
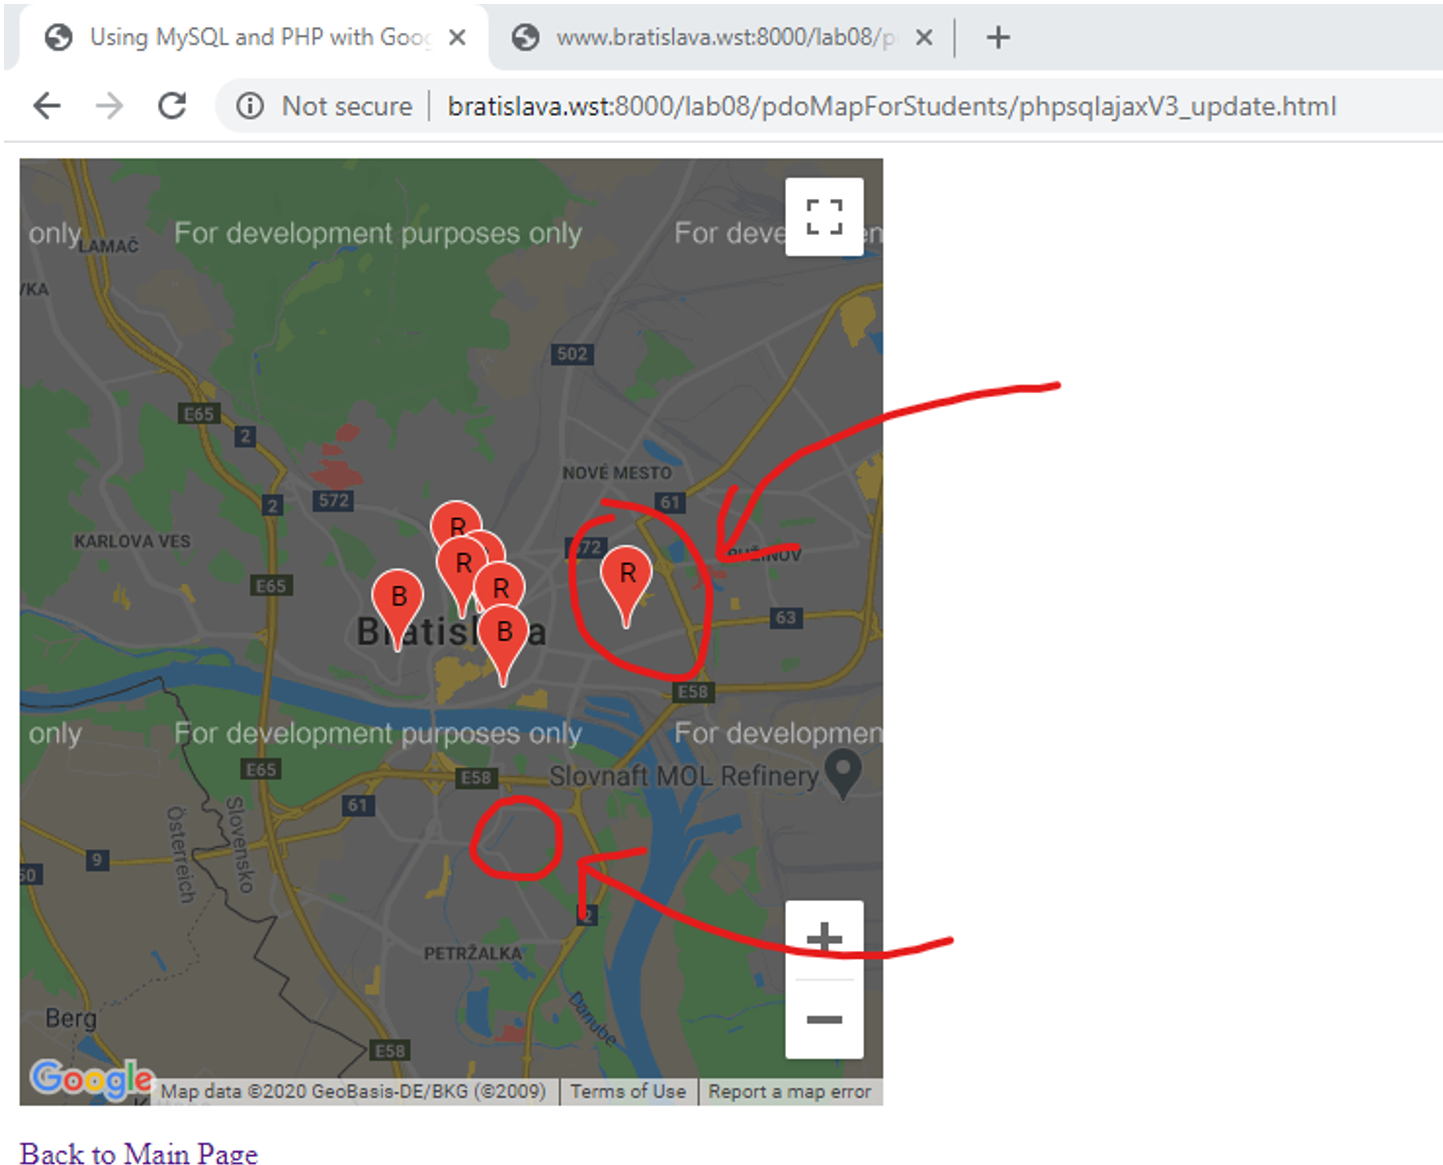
Whenever a user would like to make changes to a markers position,
they must visit the phpsqlajaxV3_update.html page. On this page (displayed in screenshot above),
the user will be displayed the map of the allocated city with multiple different markers of
different restaurants and bars throughout the city which were manually added and stored
within the database.
The restaurant circled in the screenshot above will be getting moved from its current location,
to the empty circle underneath the restaurant. Once the user clicks on a marker and then
releases it in a different location within the map, the code gathers the information of the
new position by its latitude and longitude. This information is then stored and transferred
over to the phpsqlinfo_updaterow.php file which uses the UPDATE statement to make changes to
the current information that is stored within the database. It updates the information of the
old position of the marker with the new latitude and longitude which is just gathered.
The information is automatically changed and updated as soon as the user lets go of the marker
and drops it in its new position.
Changed Location Process
As you can see from the following screenshots, the position of the marker (restaurant) was successfully moved to its new location on the map:
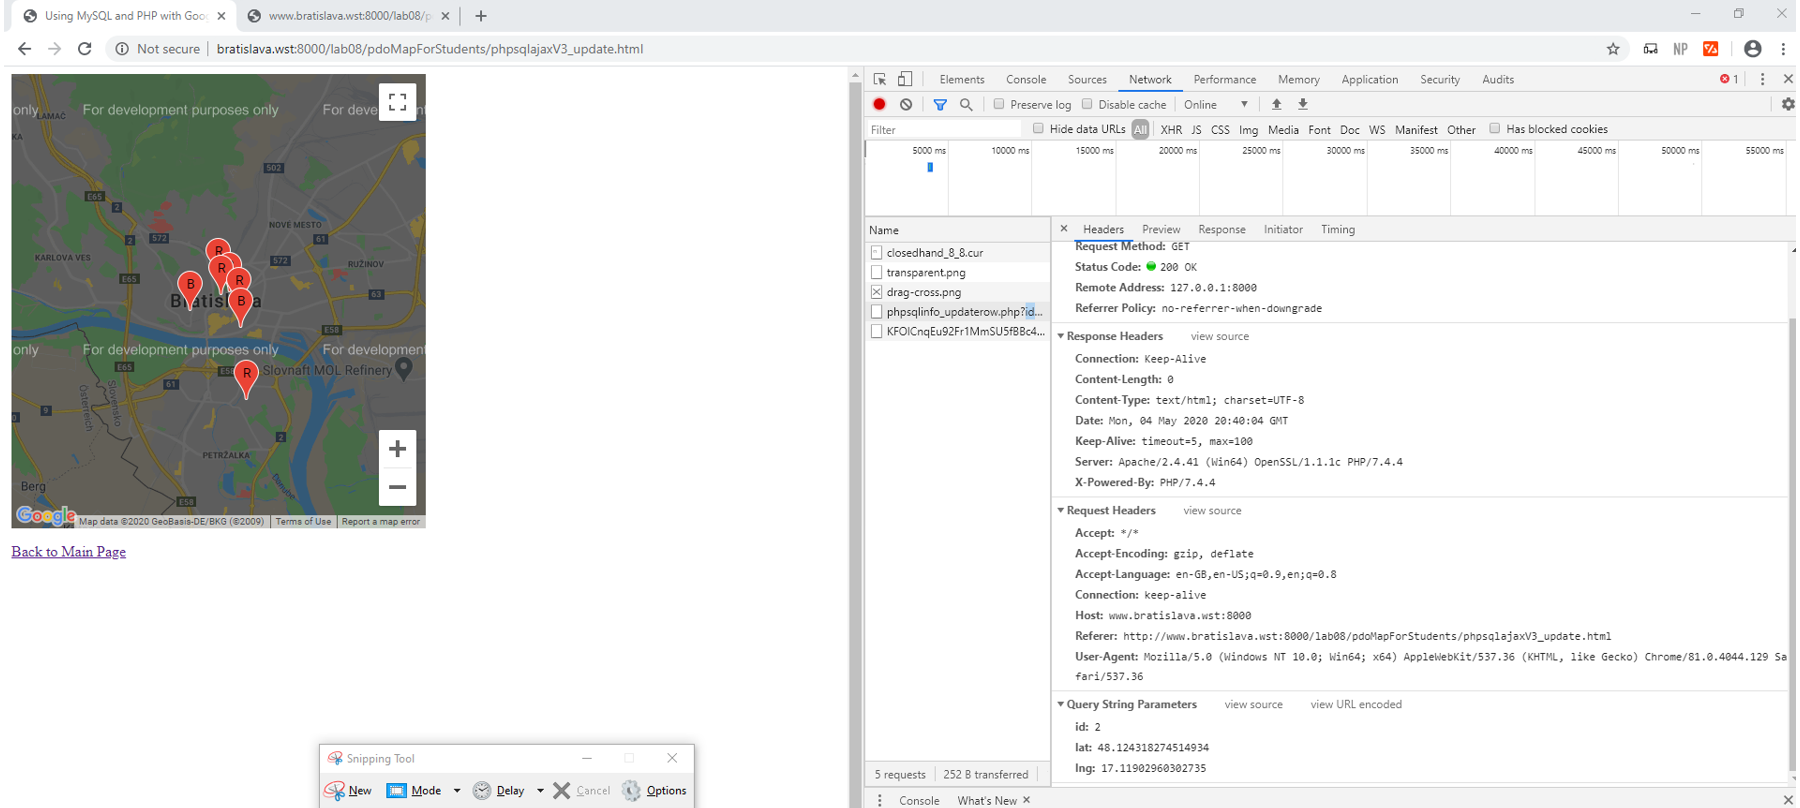
The query string parameters that are displayed within the headers section of the
chrome network extension display what marker has been moved (identified by its id)
and the new latitude and longitude of the markers new position. By having the markers id,
it lets the phpsqlinfo_updaterow.php file know what latitude and longitude needs to be
changed for what record. Without having the markers id, the whole process of making an
update would not be successful because the code would not know what record within the
database to make changes to.
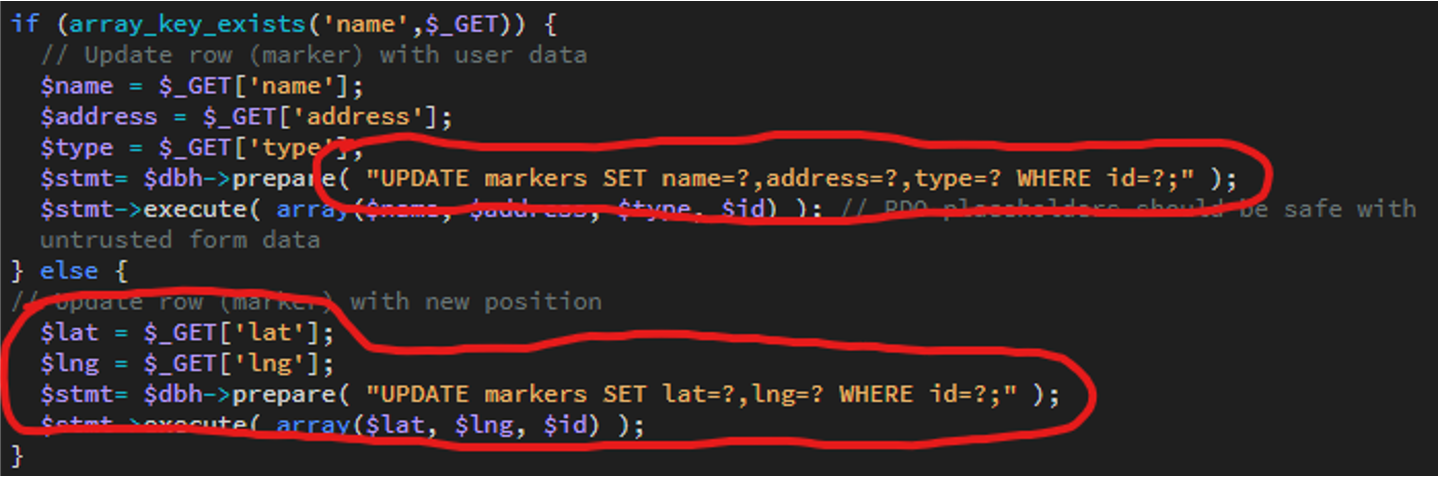
The following screenshot below is the code contained within the phpsqlinfo_updaterow.php
file which makes the changes to latitude and longitude within the database:
All the resources used in order to make everything run properly is Google’s map API which is used to display the map of the city with the markers. Resources that are hosted on our server to make everything possible is the phpMyAdmin which stores all the database information of the positions of all the markers that are displayed on the map. None of this would be possible without having both resources running at the same time. Without the database there would be no markers to display and without the map there would not be anything to display at all.
XML File
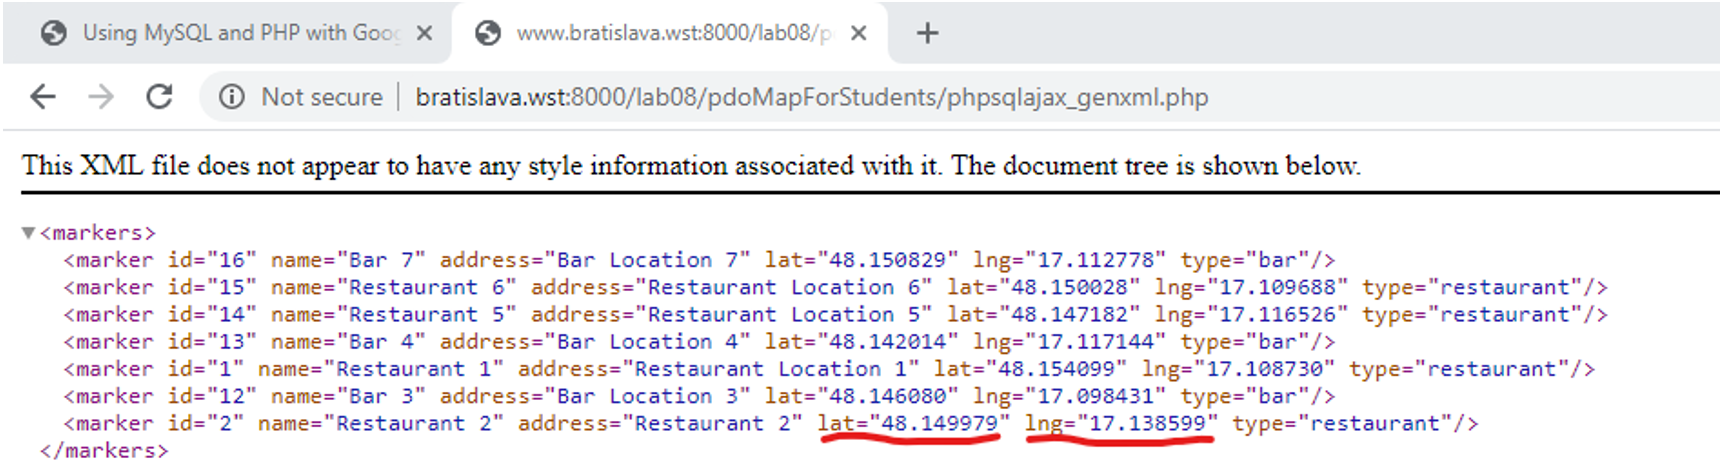
Previous XML File
The following screenshot is what was displayed within the phpsqlajax_genxml.php before the marker in the previous example had moved location:
Updated XML File
Once the marker had been moved and the details of its position on the map were gathered, the data for the latitude and longitude for the new location was then stored within the database. The new information is then displayed in the following example:
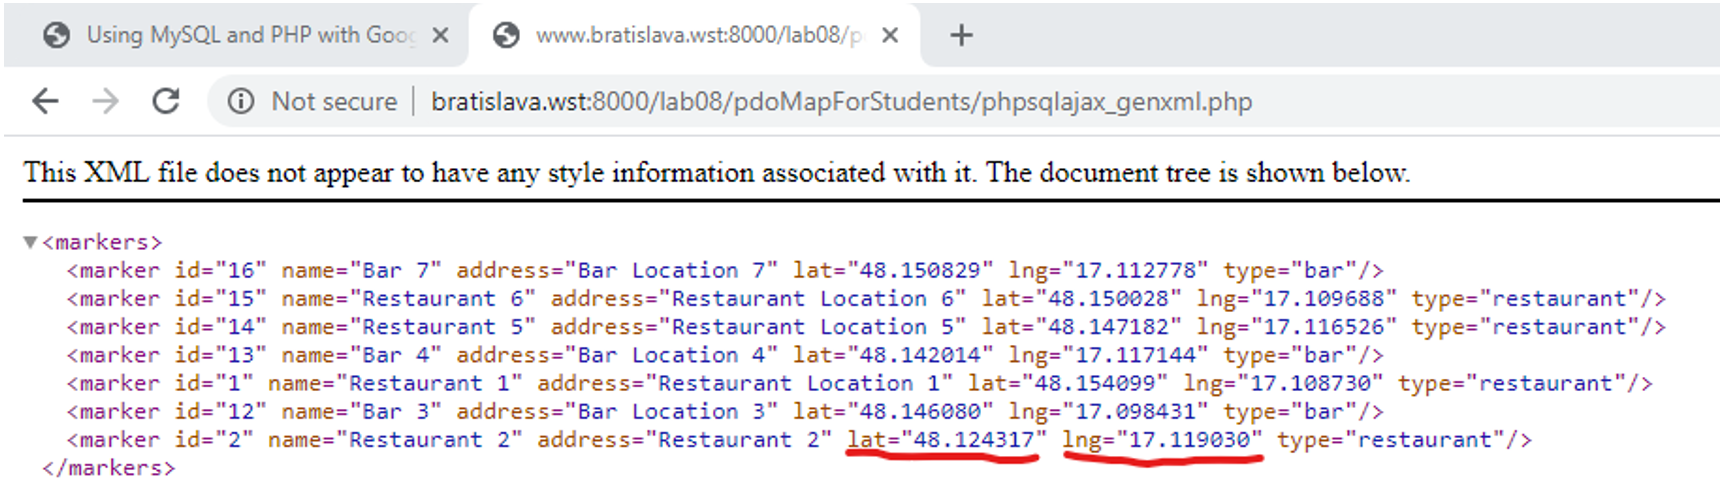
The latitude changed from 48.149979 to 48.124317 and the longitude changed from 17.138599 to 17.119030.
Updated Location Confirmation (Chrome Console Log)
To confirm that this was done properly, the following screenshot displays the Chrome console log once the updated position has been changed successfully:

The Importance of the XML File
The phpsqlajax_genxml.php page is used in order to view all the information that is stored within
the database within the browser, rather than having to log in to you phpMyAdmin and look for the
database itself. This is a quicker, easier and more user-friendly way of viewing the information.
Not only is it a good way to view the database information, it is essential for the whole process
of the update on map task to properly run. It is just another piece in the puzzle.
Without the XML being part of the process, no information would be able to be pulled and transferred
from file to file. It would also prevent the markers that are displayed within the map from displaying.
The reason for this is because all the information that is gathered for the likes of the
restaurants/bars address, name, location etc. is all downloaded from the XML and not from the
database itself. Although the database withholds this information, the code that sets the variables
for each records information is gathered from the XML and not directly from the database.
This is done within this part of the code which is in the phpsqlajaxV3_update.php file:
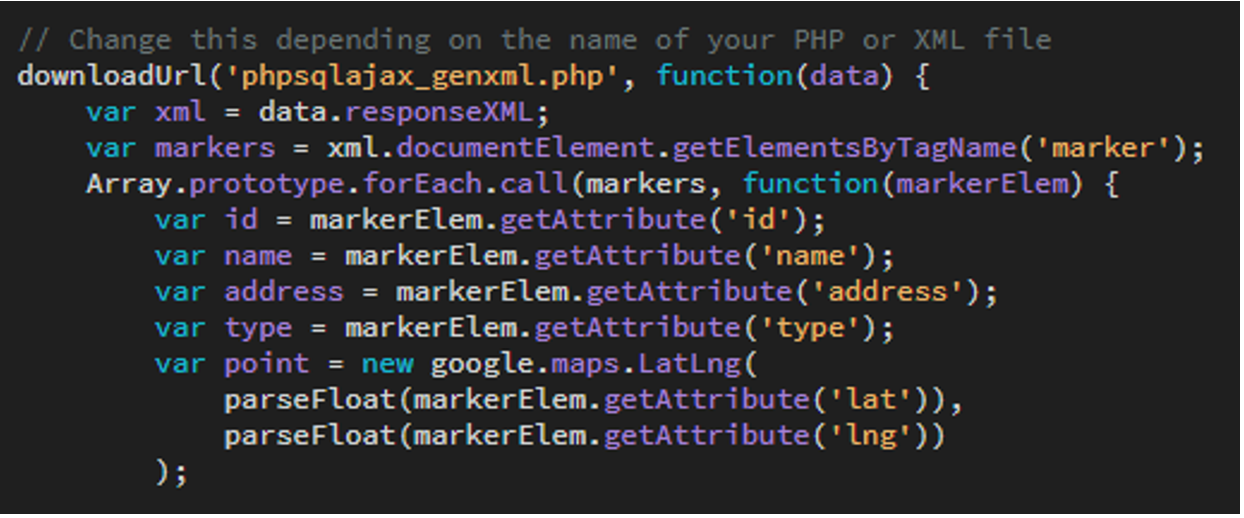
The code downloads the information and organises it by setting the information into variables. XMLs are used to allow code to easily read and organise data. The code would not be successful if it were to try and gather the information directly from the database.
Logging In
The following screenshot displays what is displayed to the user when they log in to their account for the first time:
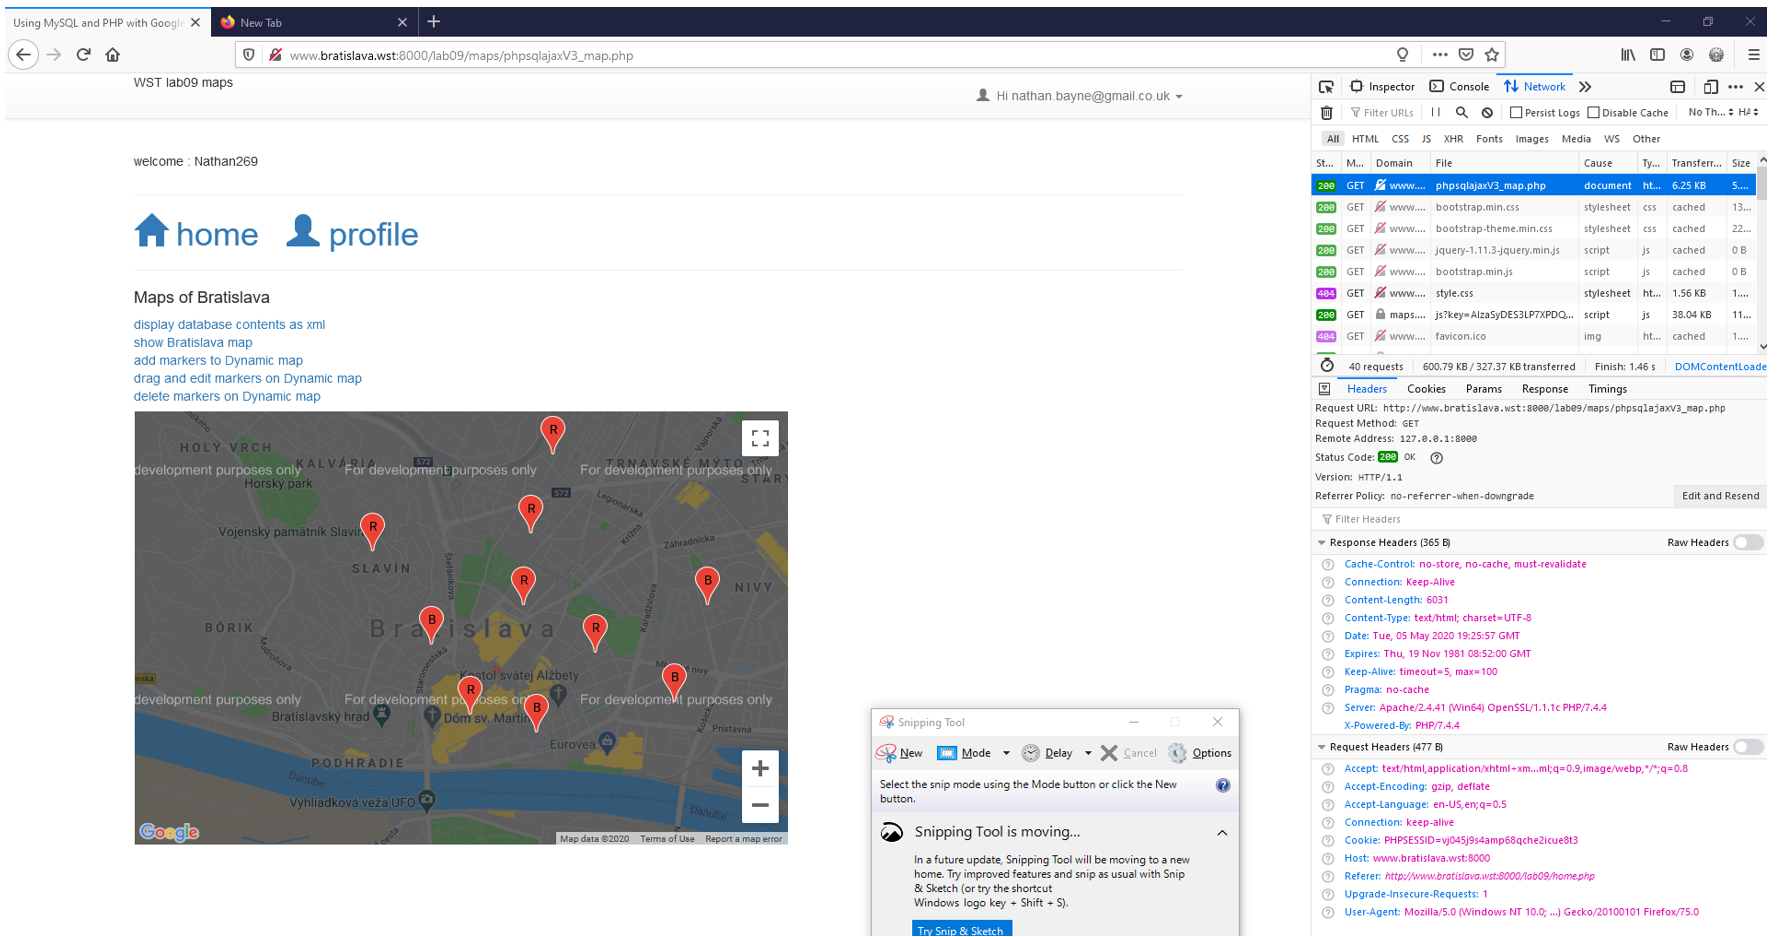
You are able to see that the user Nathan269 with email nathan.bayne@gmail.co.uk has successfully
logged in to their account. When the user signs in, a personal cookie is gathered to identify the
user from the database by the id and this helps determine their session. If the user were to flick
between the different pages, the cookie is transferred between files to let the file know where they
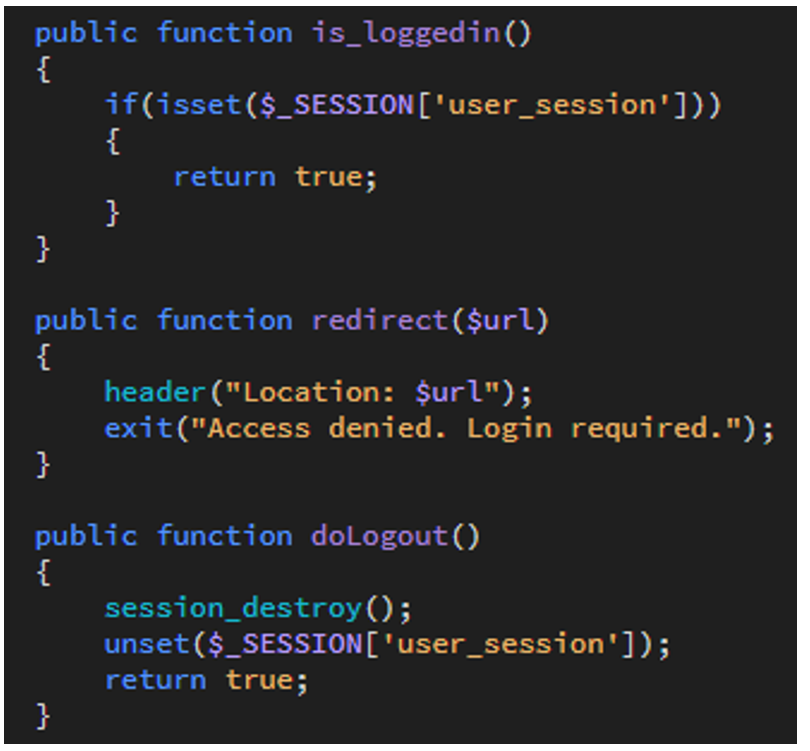
are still within the session. By knowing whether the user is in a session or not, it allows the code
to determine whether to display welcome: *username* and display their email at the top right with the
option of logging out of the account. Without knowing this information, the webpages would not know
when to display a sign in button or a logout option.
You can see the assigned cookie at the bottom right of the screenshot within the request headers.
This cookie is then stored within the XAMPP/tmp file. Within the cookie file, when you open it,
it displays that there is a session in place and that this session is being run by ID 1 (in terms of our example).
This is what the phpsqlajaxV3_map.php page looks like:
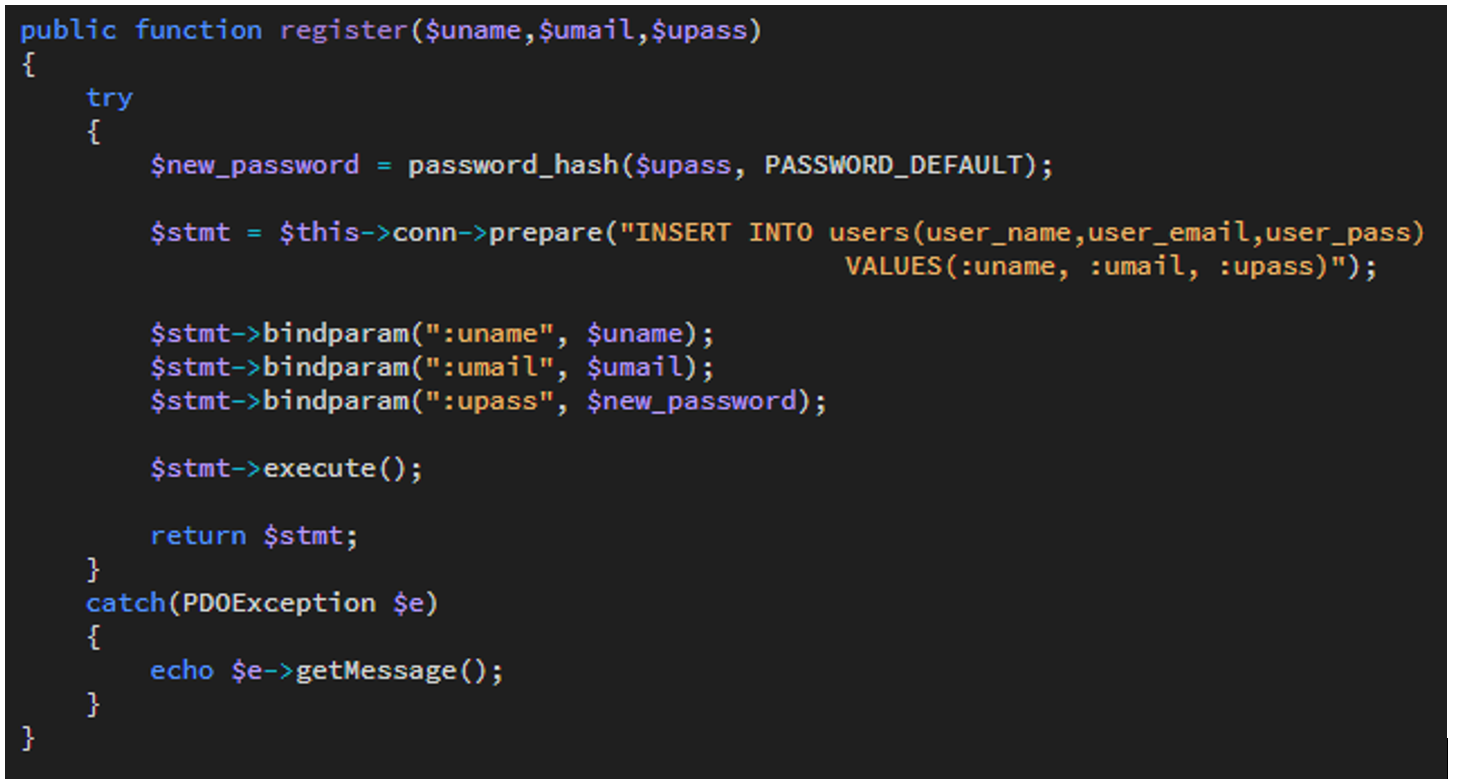
Before a user can login in, they must create their own account. When the user fills out the sign-up form, their information is inserted within the database. It is done so by the following code:
When the user has successfully created an account when they go to log in to their account, the code must check that the user is who they say they are. It must check that the information they input into the log in form is contained within the database. This is done by the following code:
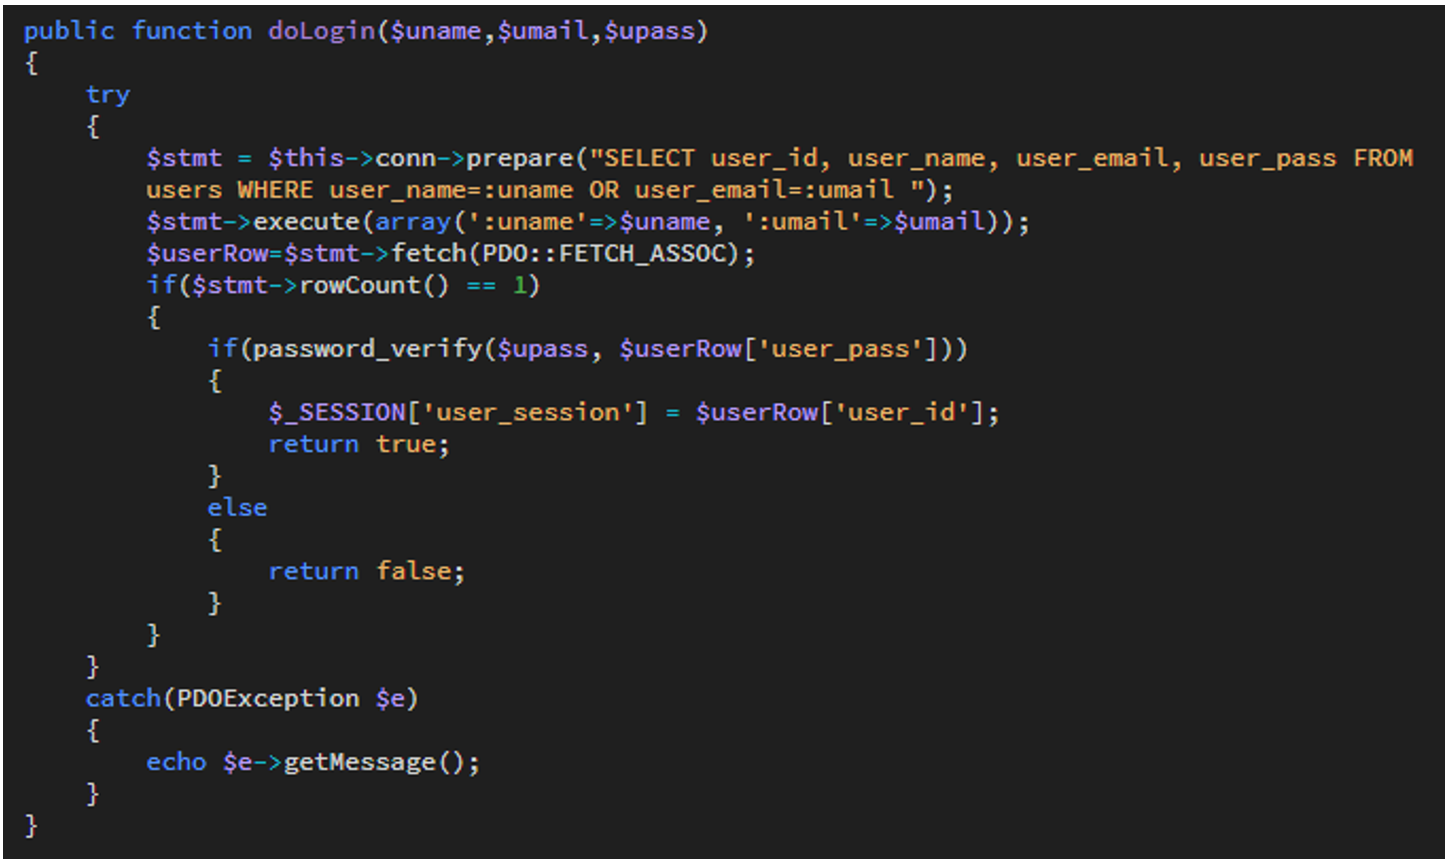
Depending on whether the log in details are correct, the code is designed to decide whether the user can log in to the account or not. The following code decides what the user’s destination is when they try to log in:
If the user fails to log in, they are not redirected to the home page and will have to attempt to log in again. An error will be displayed to the user if they cannot login properly. If the user is successful, they are redirected to the home page which will welcome the user by their username.
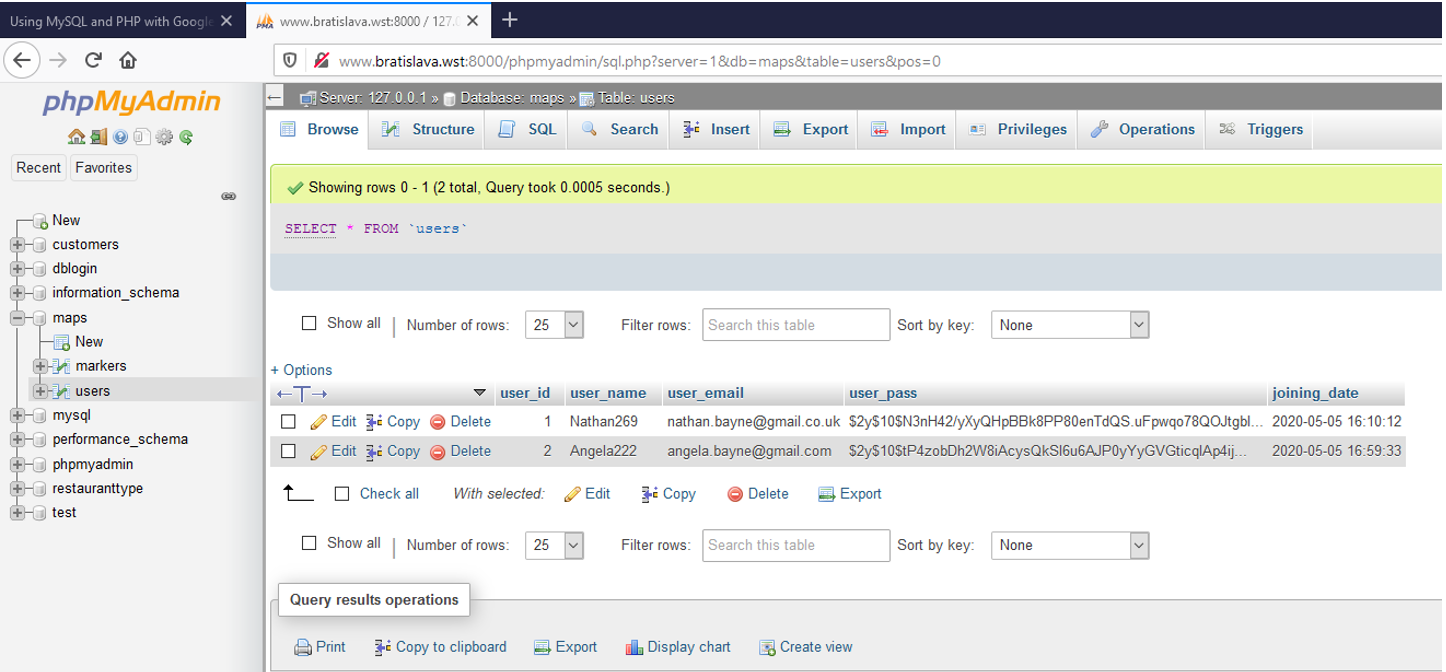
The screenshot above is of the users table that is used to store the information of a user’s username, email, password and the date they joined. An id is also stored to uniquely identify each user. You can see that the user from the previous example is shown within the users table and is identified by user_id 1. When the user submitted their form when signing up an account, the information was then sent to this database. When the information is being inserted, the password is hashed. By making the password hashed, it means that no one running the database would be able to know what the user’s password is. This is just a safety net that all databases have in place in order to prevent hackers from trying to gain user’s account information.